How can we help?
Creating your first gesture-controllable app
This is a step-by-step tutorial to get you started with integrating the AIP with your Unity project.
Setup
- Extract the Augumenta AIP Unity3D example zip file received with the SDK
- Open that folder as a project in Unity3D editor (ignore the build errors for now, they should be resolved after importing Augumenta AIP plugin)
- Open the Main scene
- Import the Augumenta AIP Unity3D plugin package as described here: Adding Augumenta SDK in your Unity3D environment
- Copy your Augumenta license file in to
Assets/Resources/License.xml(see also: How to add your Augumenta license key) - Clear the console and re-import the Assets. You should not get any error as seen in previous step 2.
Build and run
- Change the platform to the supported one. Go to the build settings, “File->Build Settings” and select your platform. Currently, we support Android and Windows (including Universal Windows Platform). If your target is Hololens, you should read also the specific settings from: Setup the project to work with Hololens
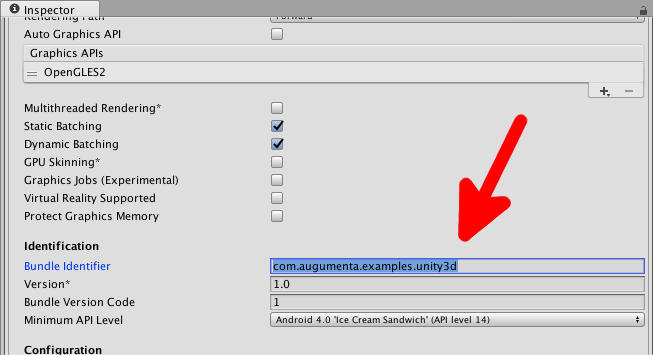
- Change the package name by first going to “Build Settings” -> “Player settings…” and then change the bundle identifier to fit your company license (i.e., in our examples we use: com.augumenta.examples.unity3d)
- Make sure that the
Scenes in Buildcontains ourMainScene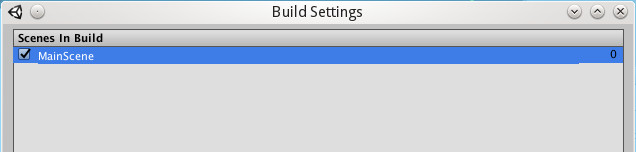
- Make sure that the
Main Camerais linked toSimpleWebCamPreviewobjectsCanvas -> Render Camera. - Build for the supported platform and run it in your target device.
Cube following the hand
Let’s create a simple cube that follows a hand (P001).
- Create a Cube object
- Change the scale of the Cube to 0.05 (5 cm)
- Create a material for the Cube to make it more visible
- Link
Augumenta/Scripts/FollowPoseHandlerto the Cube object - In Cube object inspector tweak the
Follow Pose Handleroptions
FollowPoseHandler (Script) explained
When using Android devices with the camera preview in the background it is best to use the “Relative To Screen” option. This way you select to use the position relative to camera preview on the screen.
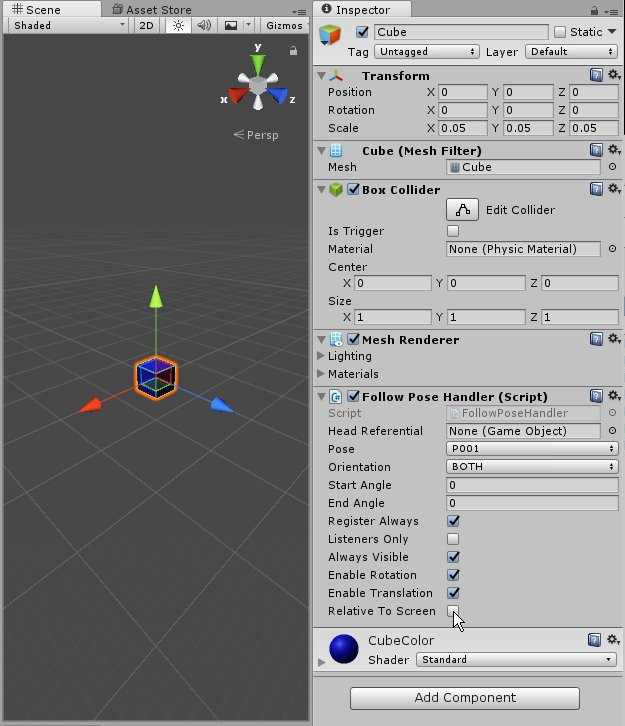
Here is a more detailed explanation of the options:
- Register Always is used so that even if the game object is not active at startup. For example, when you want the cube to be showed only when the Pose (P001) is detected;
- Listeners Only is doing the opposite. It adds the listener without registering for detection of the pose. You can register later and get the updates;
- Always Visible allows you to display the object even when is not detected. This is useful when confused about 3D or if you want to move the objects (grab and drop);
- Enable Rotation and Enable Translation allow full use of the 3D detection on the object. You need them both especially on Hololens (because of the Head motion updates);
- Relative To Screen is needed when using camera preview background. You can disable it by disabling the Canvas in the SimpleWebCamPreview object. On Hololens you shouldn’t use it unless you want the camera preview for debugging purposes.